Kitchen units and appliances
Units and worktops
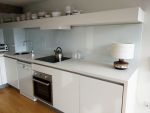
The kitchen units have been especially manufactured for Park Hill by Construction HUB Ltd. (Image 1.)
The Construction Hub Limited was dissolved in December 2015.[1]
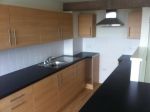
White/plywood kitchenThe kitchen units have been especially manufactured for Park Hill by Accent Kitchens Ltd (Image 2.)
Timber-look kitchenTimber-look kitchens are designed to meet the prescribed requirements for Social Housing tenancies (Image 3.)
Phase 2
The kitchen units have been especially manufactured for Park Hill by Howarth Kitchens.
Care and maintenance
Doors
Occasional marks can, in most cases, be removed with a soft damp cloth. More persistent marks can be removed using a mild solution of water and household detergent and dried with a soft cloth. Never use solvents or abrasive cleaners, as these could permanently damage the finish.
Carcasses
Do not use polish on any of the surfaces. Only clean the surface with a damp soapy cloth. Bleaches, scouring pads and multi-surface cleaners should not be used. Always clear away concentrated juice, corrosive liquid and food colourant spills, including water, as prolonged exposure can mark the surface.
Drawers, runners, doors and hinges
These should be wiped out with a damp soapy cloth and wiped dry. The roller runners are lubricated and should not be cleaned with a degreasing agent, as this may impair their function. Never lean on partially or fully open doors and drawers. The hinges are only designed to support the door. If a waste bin is required, please use one supported by the carcass and not attached to the door.
Cupboard door hinges
If the cupboard door feels unsteady or is poorly fitted, this is typically because the hinges require adjustment; carefully adjust the screws on the hinge to bring the door back into alignment. Stiff hinges can be eased using a suitable lubricant.
Wall mounted shelf (all-white kitchens)
The wall mounted shelf in the kitchen contains the cooker hood. The shelf has been designed to use as storage. Please note a single point load on this shelf should not exceed 20kg (e.g. a single item of kitchen equipment stored on the shelf should not exceed 20kg in weight). The total load on the shelf should not exceed 50kg and this load must be evenly distributed across the length of the shelf.
Wall mounted unit (white/plywood kitchens)
The wall mounted unit in the kitchen contains the cooker hood.
The unit has been designed to use as storage. The recommended shelf loading is 15kg per shelf section (i.e. a single item of kitchen equipment stored on the shelf should not exceed 15kg in weight).
The total load on the unit should not exceed 60kg and this load must be evenly distributed over the shelves inside.
Worktops
The worktop joints and inserts are not guaranteed against water ingress, which can lead to damage. Therefore, moisture should be avoided in surface joints (e.g. between two worktops or at the joint with the splashback) and spillage or standing water should be wiped off immediately. Do not rest hot pans or use knives on the worktop without suitable protection, otherwise the laminate surface may be permanently damaged. Please take care not to drag items across the worktop surface as this may lead to scratching and always use an appropriate utensil (i.e. a chopping board) to prevent marks and cosmetic damage to the worktops.
Stainless steel sinks, drainers and chrome taps
These are best cleaned with warm soapy water, wiped dry and then buffed with a soft cloth to restore the polished surface. If undiluted disinfectant and bleaches spill on to the sink or taps, they will leave a permanent stain, if not removed immediately. Persistent water stains may be removed with vinegar and the sink should then be rinsed with water and detergent.
Glass splash back
Clean with mild detergent or non - abrasive cleaner.
Notes
Use of hob
To avoid damage to the kitchen units and surrounding finishes do not switch the ceramic hob on before placing a pan on the ring(s) to be heated. Similarly, do not leave the hob switched on if there are no pans on the heated ring(s).
Appliances - original specifications
Phase 1
Flank A flats (mainly)
| Appliance | Manufacturer | Description | Model | Notes | User manual
(PDF) |
|---|---|---|---|---|---|
| Oven | CDA | Four function electric fan oven | SC221 | Download | |
| Hob | CDA | Ceramic hob | MHC002 | Download | |
| Fridge | CDA | Integrated under counter fridge | FW223 | 2&3 bed and 1 bed I & J | Download |
| Fridge with freezer box | CDA | Integrated under counter fridge with ice box | FW250 | 1 bed only | Download |
| Freezer | CDA | Integrated under counter freezer | FW283 | 2&3 bed and 1 bed I & J | Download |
| Dishwasher | CDA | Fully integrated dishwasher | MW001 | 2&3 bed only | Download |
| Extractor fan | Baumatic | Recirculating extractor canopy | CAN52.3ME | Download | |
| Washing Machine | Not provided but power and plumbing provision was made for future installation. These will therefore vary between flats. | ||||
Flank B & C flats (mainly)
| Appliance | Manufacturer | Description | Model | Notes | User manual
(PDF) |
|---|---|---|---|---|---|
| Oven | CDA | CDA seven function electric multi-function oven | SC612 | Download | |
| Hob | CDA | Ceramic hob | HC6620 | Download | |
| Fridge | CDA | Integrated under counter fridge | FW253 | 2&3 bed | Download |
| Fridge with freezer box | CDA | Integrated under counter fridge with ice box | FW250 | 1 bed only | Download |
| Freezer | CDA | Integrated under counter freezer | FW283 | 2&3 bed | Download |
| Dishwasher | CDA | Fully integrated dishwasher | WC140 | 2&3 bed only | Download |
| Extractor fan | Caple | Recirculating extractor canopy | 2MBUCH2 | Download | |
| Washing Machine | Not provided but power and plumbing provision was made for future installation. These will therefore vary between flats. | ||||
Phase 2
| Appliance | Manufacturer | Description | Model | Notes | User manual
(PDF) |
|---|---|---|---|---|---|
| Oven | Caple | Classic Electric Single Oven | C2234 | ||
| Extractor | Caple | Built-under hood extraction fan | BU521 | ||
| Hob | Caple | Electric Ceramic Hobs | C816C | ||
| Fridge with ice box – under counter | Caple | Built-under larder fridge with ice box | RBR7 | 1-bed properties only | |
| Fridge – under counter | Caple | Built-under larder fridge | RBL5 | 2/3-bed properties only | |
| Freezer – under counter | Caple | Built-under freezer | RBF5 | 2/3-bed properties only | |
| Fridge/freezer - full height | Caple | 70/30 fridge/freezer (frost free) | Ri7306 | ||
| Dishwasher | Caple | Fully integrated dishwasher | Di632 | 2/3-bed properties only | |
| Washing Machine | Not provided but power and plumbing provision was made for future installation. These will therefore vary between flats. | ||||
Care and maintenance
Refer to the individual appliance manufacturer’s manual.
Warranties
The owner/occupier is responsible for registering all appliance warranties. Please refer to the individual appliance manuals for details on how to do this.
Portable Appliance Testing (PAT)
Portable Appliance Testing may be undertaken for tenanted properties. Where this is the case, a label indicating the pass date may be attached to the appliance.
Placing service calls
When reporting problems with appliances, you will need to provide the following information:
- Resident’s full name and postal address.
- Make and model of the appliance, with brief description of the fault.
- Product identification number(s), which can be found either on a plate on the appliance or on the appliance instruction booklet.
- Date on which the original apartment sale was legally completed.
Notes
Before order or attempting to fit any new appliances it is advisable to check all measurements to ensure that the appliances will fit into the available space.
Note that some kitchens in Phase 1 have hobs which are not compliant with current regulations that require a ‘hot zone’ of 65cm clearance.[2] As a result, you may have difficulties finding a retailer or electrician to fit any new hob that you purchase.


